If you’re experiencing errors such as “SIM Not Provisioned” on your device, then this blog is for you! This article will discuss the different causes and possible solutions for SIM not provisioned MM2 errors. By following the steps outlined here, you should be able to fix your device and restore normal service.
What Does “SIM Not Provisioned” Mean?
If you’re having trouble making calls, sending texts, or using data on your device, it may be because the SIM card hasn’t been installed yet. Sometimes, this issue can be fixed by following the steps below. Before you do anything, back up your information in case things go wrong. If the solutions listed below don’t work, you’ll need to contact your carrier for assistance. There are a few different ways to fix the issue, but the best way to find out is by trying them all out and seeing which one works best for you.
5 Ways to Fix “SIM Not Provisioned” Errors
If you’re facing the dreaded “SIM Not Provisioned” error on your device, don’t worry – you can fix it using the following steps. Follow the instructions carefully, and you should be ready in no time.
1. Restart Your Phone
Sometimes, restarting your phone can fix SIM not provisioned errors. To do this: – Close all the apps on your phone – Hold down the power button for about 10 seconds until you see the android logo appear, and start to scroll across the screen.
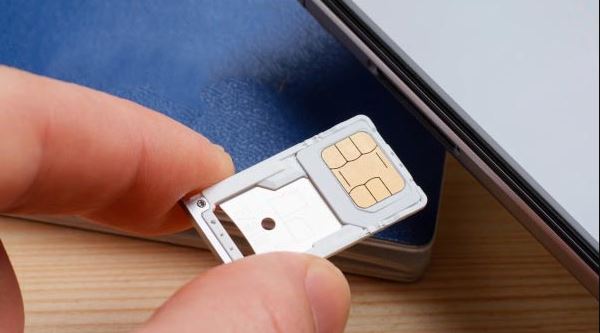
2. Correctly Insert the SIM Card
If you’re experiencing issues with your SIM card not provisioning or being rejected, the first step is to check that it’s inserted correctly. Fortunately, this process is very simple and can be done in a few minutes. First of all, make sure the SIM card is facing down, and the contacts should be lined up properly. Then insert it fully into the phone until it clicks into place – if everything looks okay, you can restart your device by pressing and holding the power button for at least 5 seconds until you see an Android logo appear onscreen.
3. Enable and Disable Airplane Mode
If you’re experiencing issues with your iPhone connecting to the network, disabling airplane mode may help. Turning off airplane mode when not in use can also save on battery life. To enable or disable airplane mode on an iPhone: – Tap Settings -> General -> Restrictions -> Airplane Mode. .
4. Update Carrier Services
If you are getting “SIM Not Provisioned” errors, it is probably time to update your carrier services. This can be done in a number of ways – by phone, online, or even through the provider’s app. Make sure you do it as soon as possible to fix any issues that might be causing the error message.
5. Contact Your Carrier or Network Provider
If you are still having trouble with your service, the next step would be to contact your carrier or network provider. They might have some troubleshooting tips that can help get the issue resolved. Hopefully, this will fix whatever is causing the problem!
Conclusion
If you’re experiencing issues with your SIM card not being provisioned on your device, follow these simple steps to fix the issue. This troubleshooting guide will help you fix SIM Not Provisioned errors on your device, so don’t worry! We hope that this article has helped and that you’ll be able to fix SIM not provisioned on your device soon!
Amit Roy is a tech blogger from Kolkata, India. He loves to write about tech contents. Amit has an experience of 5 years+ in Digital Marketing and Blogging. Amit loves technology and cats.